Set up Throttle Builder for your store
Install Throttle Builder, connect your store, create and publish pages, and optionally let an AI agent build them for you, safely, from your own account.
Throttle Builder is where you build the pages of your store without code: the home page, content pages, landing pages, the header and footer, and the announcement bar at the top. This guide takes you from nothing to a published page. Plan on an hour the first time, most of it spent on the two steps that need whoever builds your store.
You will need a Throttle workspace with your store’s application, and the Product Catalog if you sell products. Someone who builds your store’s website has to connect it once. That person is called your developer below.
1. Install Throttle Builder
- In the Throttle dashboard, open Marketplace and find Throttle Builder.
- Choose Install and follow the steps. The install screen lists what Builder may do in your workspace. It asks to read and add to your media library, which is where your images live.
- Open Throttle Builder from your installed extensions.
The top bar of Builder has nine places: Pages, Site, Connections, Media, Keys and AI agents, Store webhooks, Widgets, Saved sections and Code.
2. Connect your store
Open Connections.
Product Catalog. If you sell products, Builder needs a key to show them in its widgets. In Product Catalog, make a publishable key for the server channel, paste it into Catalog server key and choose Link key. Only its last four characters are shown afterwards. Without it, product widgets show placeholders in the editor.
Your store. Under Your store, enter your Store URL (for example https://shop.example.com), then choose Save to draft and Publish site settings. The store address is used for links in the editor and as the place Builder sends change notices. Your developer also gives the store its own address in its code, for canonical links and the sitemap.
3. Give your developer a key
Your developer’s code needs a key to read what you publish.
- Open Keys and AI agents and choose Create a key.
- Choose Publishable and the Server (your own backend) channel.
- Create it and copy the key. It is shown once.
- Send it to your developer over a private channel. They set it as
THROTTLE_BUILDER_KEYon the server of your store. It must never go in the browser.
If you ever lose it, make a new one and remove the old one from the same screen.
4. Tell your store when you publish (Store webhooks)
On Live, your store learns about a published change from a signed note that Builder sends it. Set that up once.
- Open Store webhooks and, under Add an endpoint, leave Endpoint URL empty and choose Add endpoint. Left empty it is your Store URL followed by
/api/throttle/builder-revalidate, so your developer builds the route at that address. Use a different public https address if your developer prefers. - Builder shows the endpoint’s secret once. Copy it and send it to your developer over a private channel. They set it as
THROTTLE_BUILDER_WEBHOOK_SECRETon the store’s server.
Without this step your store still works, but a change can take up to an hour to show. (Build-time stores need no webhook: they change on a release.)
5. Choose how pages reach your store
Open Site, then Delivery. There are two choices.
- Live is the default and the simplest. The store picks up what you publish within moments.
- Build-time keeps changes waiting until you press Release, then your store is built once with everything you published.
Not sure? Stay on Live. The delivery modes guide explains the difference, what each costs and how to roll back. You can switch at any time.
6. Build-time only: add your deploy hook and make the first release
Skip this step on Live.
A deploy hook is a private web address that tells your host to build your store again.
- In your host, make one. On Vercel, open your project, then Settings, Git, Deploy Hooks, give it a name and copy the address. Netlify and other hosts have the same idea under build hooks.
- In Builder, open Site, Delivery, paste it into Deploy hook URL and choose Save deploy hook. Builder shows only the end of it afterwards. It must be a public https address.
- Make sure a few pages are published (step 8), then choose Release now.
The release appears under History. It says Sent to your store host when your host accepted the request. If it says your host did not accept it, check the hook address. With no hook set, a release is still saved, and you start the build in your host yourself.
7. Create your pages
- Open Pages.
- Type a name under New page name, choose Content page or Landing page, and create it. It opens in the editor as a draft.
- Add sections and widgets, and change what they say. Use the device buttons to check the phone and tablet views.
Already have a design in Product Catalog? Open Site, then Import, to bring in its theme, brand, menus, announcement, home page and content pages. They arrive as drafts for you to review, nothing is published, and the catalog is never changed. Only what is published in the catalog is imported.
Then set the look of your store under Site: Theme, Brand, Menus, Announcement, Search and sharing and Wording. See custom pages for addresses and renaming, and search and sharing for how your pages appear in Google.
8. Publish
Nothing you do in Builder is live until you publish it.
- On Pages, each page shows Draft, Unpublished changes or Published. Choose Publish on a page that has changes. A page you have never published is published from inside its editor.
- Site settings (theme, brand, menus, announcement, wording) are published together with Publish site settings.
- On Live, the page appears on your store shortly after. On Build-time, it waits for your next Release now.
Preview a draft first. A preview link shows the page at desktop, tablet and phone width, and works for one hour.
Optional: let an AI agent build your pages
You can skip this whole section. Everything above works without it.
What this is, if you have never used MCP
An AI agent is an assistant, such as Claude, that can take actions for you instead of only answering questions. MCP (Model Context Protocol) is the standard plug that lets an assistant use a tool. Throttle Builder is the tool and the assistant is the one using it. Once they are connected you write what you want in plain words, for example “add a winter sale page with a countdown”, and the assistant reads your store, makes the change as a draft, looks at the result in a browser and tells you what it did.
Connecting means telling the assistant two things: an address (the same for every store) and who it is allowed to act as. There are two ways, and you need only one.
| If you use | Connect with | You need |
|---|---|---|
| claude.ai or the Claude desktop app | The address only. You sign in to Throttle and approve. No key. | Your Throttle login |
| Claude Code, Cursor, VS Code, Windsurf or another coding tool | The address and a key. A key is a password you make in Builder and paste into the tool. | A key from Keys and AI agents |
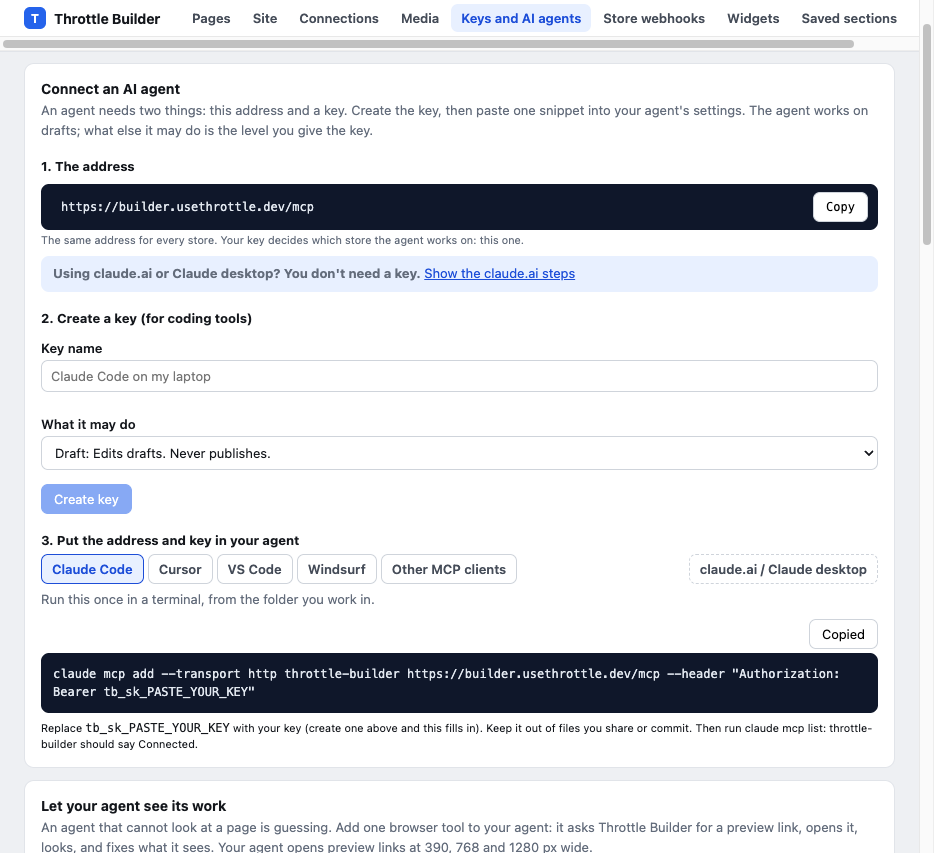
The address is https://builder.usethrottle.dev/mcp. The Keys and AI agents screen shows it first, with a Copy button.
Pick how much the agent may do
Every key and every connection has one level. You choose it when you make the key or approve the connection. Start with Draft: nothing the agent does goes live until you publish it yourself.
- Read: Reads your site and pages. Changes nothing.
- Draft: Edits drafts. Never publishes.
- Publish: Edits and publishes pages and site settings. Never publishes page deletions, saved sections or releases.
- Full: Publishes everything, including page deletions, saved sections and releases.
You can lower a level at any time and it applies on the agent’s very next action. Only the workspace owner, or the person who installed Throttle Builder, may grant Full or the Code switch (see below). Other people with Builder access may grant up to Publish, and other members only Read. If you are not allowed to pick a level, it is shown greyed out with the reason.
Connect claude.ai or Claude desktop (no key)
- In claude.ai or the Claude desktop app, open Settings, then Connectors, then Add custom connector.
- Name it Throttle Builder and paste the address. Leave Advanced settings empty: do not paste a client ID or a secret.
- Choose Add, then Connect. Throttle opens in a new window: sign in.
- Pick the workspace, application and environment where Throttle Builder is installed, choose a level, and choose Approve.
If Claude says it could not connect, wait up to five minutes and try again. You can revoke the connection later under Connected assistants on Keys and AI agents.
Connect a coding tool (address and key)
- Open Keys and AI agents. Under Create a key, name it (for example “Claude Code on my laptop”), choose a level and choose Create key. The key is shown once, so copy it now. Keep it private and out of files you share or commit. Keys do not expire, and you can revoke one from the same screen.
- Pick your tool’s tab under Put the address and key in your agent. The snippet there has your key filled in, with a Copy button. Paste it where your tool says. Snippets for every tool, and where each file lives, are in the developer docs; they are not repeated here.
- Check it. Claude Code: run
claude mcp listand look for “Connected”. Other tools: restart, then look forthrottle-builderand its tools in the tool’s MCP settings. - Choose Test this key on the same screen. It tells you the key works, which level it has and how many tools it can use.
Give the agent a browser so it can see its work
An agent that cannot look at a page is guessing. Throttle does not take screenshots for the agent. Instead it asks Builder for a preview link, opens it in a browser of its own, looks, and fixes what it sees. Add one browser tool to your agent. Playwright MCP is the one to start with; the Keys screen and the developer docs show how to add it, and two alternatives. Ask the agent to check its work at 390, 768 and 1280 pixels wide: phone, tablet and desktop.
A first request to try
Use the throttle-builder tools. Read my site and pages first. Then make a page called “Winter sale” with a hero, a four-product grid and a countdown to 2026-12-24 18:00 (my time). Check it in your browser at 390, 768 and 1280 px wide and fix anything that looks wrong.
What an agent can build
- Pages, header, footer and the whole site design: theme, brand, menus, announcement, search and sharing, wording.
- Interactions: a section can be tabs, an accordion, a carousel, or show and hide, with its columns as the panels. A countdown widget counts down to a date, and anything can animate in as it scrolls into view.
- Custom CSS for fine styling, under Site, Theme.
- Saved sections: build a section once and reuse it on many pages. Manage them under Saved sections. Editing one changes every page that uses it, so publishing a saved section needs the Full level, and a saved section still in use cannot be deleted: Builder lists the pages that use it.
- Media: upload from a link, write alt text, delete.
These need your store to run the newer Builder packages (@usethrottle/builder-react 0.4.0 or later). Ask your developer to upgrade before you use them; the developer docs have the details.
Undo
Every draft change, whether by an agent, by you or by an import, is recorded. In the editor, open History and look at Changes: choose Undo on the newest change to take it back, and again to go further back. An agent can do the same. Undo only touches the draft: it never publishes anything, and an undo itself cannot be undone, so make the edit again instead.
The Code switch: off by default
A code widget is a custom widget with its own JavaScript. Code can read and change anything on your store pages. So it is off until a person turns it on.
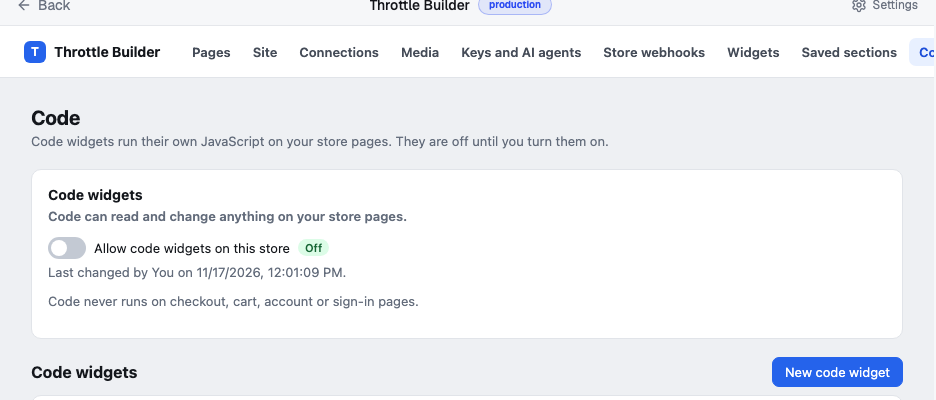
- Open Code and turn on Allow code widgets on this store. You confirm after reading the risk sentence. Only a workspace admin can. No agent and no key can turn it on for you.
- An agent can write code only if its own key or connection has the code switch, and only the workspace owner or the Builder’s installer may grant that.
- Turn off all code is one click on the same screen. It takes effect on the very next visit, even for pages your store has saved.
- Code never runs on checkout, cart, account or sign-in pages.
- Every save is a version with its author, and Roll back is next to each one.
If you do not need custom JavaScript, leave it off. Everything above works without it.
Keeping control
- Draft is the safe default. An agent at Read or Draft stops and gives you a preview link instead of publishing.
- At Publish or Full, the agent publishes when it thinks the work is correct, without asking you. Choose that only when you want it to finish alone.
- A key you made before levels existed keeps what it could do and shows as Custom (legacy) until you change it.
- Agents never change your Product Catalog data, your store connection, your keys or other agents’ access.
- If something goes wrong with a connection, look at Troubleshooting at the bottom of the Keys screen, or see the developer docs.
If something looks wrong
- My page does not show on the store. Check it says Published on the Pages screen. On Build-time, press Release now and wait for your host to finish the build.
- My images are missing. Ask your developer to check that the store allows images from Throttle’s media address. Builder images show only from the one address the store is set up for.
- My product widgets are empty. Check the Product Catalog key on Connections.